I was discussing the progress of the Beetle project with my wife the other day, I was telling her that I needed to finish this up, add that part, rebuild these pieces, take all the little parts to the paint shop, order the hundreds of new parts I will need, and . . . Anyone who has ever done a complete body off pan strip and cut up, complete project like this, knows exactly what I am feeling right now. It's thousands of little things to keep your head around. I quickly discovered I was going to need something other than my tiny little brain to keep track of all the details and finances that are required to do a project like this. I have done seven project cars of my own over the years, from various stages of work required. I have worked on hundreds of cars that were not my own, but I can tell you for certain that this is the most involved I have gotten into a restoration project, ever.
I let my head spin for a couple of days and I realized I was in a funk about the whole thing. There were no quick fixes here, just lots of effort and time. It will literally be at least two years before I can be rolling down the road in my hot new Beetle. In that flash of uneasiness, I could see just how so many projects got to a similar stage and just stopped. The project manager just simply hit the "Project Overwhelm" point and locked up. I have never hit that point in a project before. As project cost go, this isn't a huge project, as far as complexity however, it's a pretty big deal.
My solution was to start making lists. I made a budget that projects the costs of completion with several options of restoration thoroughness. You know, the wish list (full blown hot rod, all the way to doin' it on the cheap.) This took a couple of days and really helped me get my head around the tasks at hand. Next I started making lists of things that needed to get done. I broke the project down into four major sections, Pan (rolling chassis), Engine, Interior, and Body. I listed all the things I needed to do to finish each of these sections and then worked out the order I will be tackling these four sections. Again, more clarity. Next I worked up parts lists and rough estimates of when I needed to order parts for each section.
I stopped short of putting the project into a time-line. That would have helped, but I really want to enjoy this project, not feel like I am always behind on some artificial time-line, imposed by some knuckle head that really has no idea about how much effort is required here (that would be me!). I get enough of that crap at work. Then a shocking revelation hit me, this was as bad as it gets! The car is as stripped down, taken apart, and spread out as it ever will be for this project. The very next thing I do will be putting things back together. That was huge. I have turned the corner. Things are on the uphill side now.
The moral to this story? Shake it off man! Get your crap together and think it through, don't let yourself get down about all the work left to do, that’s why you started restoring cars in the first place, you enjoy the work, just think of all the fun left ahead of you. Lots of evenings in the garage sipping on a cold (or hot this time of year) beverage tinkering with the project. Make a list, build a budget, start a blog about your car, (We all like to read those, they keep us motivated and it gives us new ideas.) But most of all, work on the project a bit every day, even if it's cleaning a few parts, or organizing nuts and bolts, get to it. Progress will start to happen. That’s when it gets fun.
Tuesday, February 1, 2011

Vehicle restoration; the rule of three
As I stand here surveying the Beetle project, I suddenly realized that it takes at least three times as much room to hold a stripped apart car project as it does to hold the assembled car. My work shop is full, my spare garage stall is full (I am parking out in the snow this winter so I can work on the car) and the body is on a trailer, under a tarp, parked outside the workshop. Even my tool shed has seats and door panels stored in there for the winter. If you are thinking of diving into a project like this, plan for the room needed. I didn't realize things would get this spread out. Wow! Don't forget, you need room to work as well.
Friday, January 28, 2011
Sure beats the heck out of scraping and wire wheeling!
Monday afternoon My brother-in-law Steve and I headed down to Plainwell, MI to media blast the tunnel and a small pile of little parts. The place we went to is called Consolidated Stripping The guy to talk to is Don. They rent out blast cabinets and a blast room. Their rates are reasonable and the equipment works pretty well. We started out working in the two man blast cabinet. This works by putting the parts in, closing up the cabinet and there are two sets of gloves and two blast nozzles.

After we finished with the little parts, we took the tunnel into the blast room where Steve and I suited up and set the tunnel on a couple of barrels. We spent 45 minutes cleaning the tunnel and we were done.


And finally, a pile of clean parts.

The price for all this is pretty reasonable and is based on the number of operators and which booth you use. We managed to work for a full 2 hours between both booths and it cost me $60. This included the equipment and blast media. I thought that was pretty reasonable.
Over the next couple of days, I cleaned and sanded the parts a bit and sprayed them with etch primer. Ready for welding in the pans and then sealing up the seams.


After we finished with the little parts, we took the tunnel into the blast room where Steve and I suited up and set the tunnel on a couple of barrels. We spent 45 minutes cleaning the tunnel and we were done.


And finally, a pile of clean parts.

The price for all this is pretty reasonable and is based on the number of operators and which booth you use. We managed to work for a full 2 hours between both booths and it cost me $60. This included the equipment and blast media. I thought that was pretty reasonable.
Over the next couple of days, I cleaned and sanded the parts a bit and sprayed them with etch primer. Ready for welding in the pans and then sealing up the seams.


Monday, January 3, 2011
Adding beam adjusters
There is an enormous amount of info out there about installing a set of Avis adjusters on a Beetle beam. Before I started, I did a bunch of research and found what I needed, however, it took a bunch of digging. You can think of this as my interpretation of how to do this. I am sure there are many more ways, if so, let me know!
For this project, I started with the 67’ ball joint beam that was stock from my car. My beam was in great shape and I didn’t want to replace the needle bearings with urethane, or Delrin; the stock needles are working great.
First off, I stripped the beam of everything but the needle bearings and cleaned the beam up so the main chunks of old crud were scrapped off and I could handle it without getting all nasty.
Now, here is where it got fun! My Brother-in-law, Steve, stopped by and brought along a spare beam, you know, because everyone has one for just such an occasion. We bench engineered for about 20 minutes and decided it would be easiest to cut sections out of the donor beam and use these to install the center retainers. Remember, I was worried about saving the bearings, and beating the center retainers loose with a big pipe, or rod and a sledge hammer just didn’t seem like a good thing to do to the bearings. So cut we did!

Now, the main tubes for the Beetle beam are much thinker than I thought, it’s .160” (4mm) thick and took some work to cut it. We used a sawzall and ran it nice and slow while Steve dribbled Tap-Magic (the best stuff on the planet by the way) on the cut while I sawed away. Worked great. We took about a 3” (75mm) section out of the middle of the upper tube to start with. It works really nicely to cut and install the adjusters in only one tube at a time, that way you don’t loose alignment of the tubes.
We placed the curved serrated piece of the adjuster kit on the section of tube we just extricated from the donor and scribed marks to show us where the slot would need to be made. I center-punched the end holes and drilled those out with a 5/16” (16mm ish.) drill bit.

Next I cut the rest of the slot using the sawzall method again.

Being of the "chicken" variety, I made the slot a bit narrow and I opened it up using the angle grinder.

This slot is not critical and could be made a couple of mm oversize and not hurt anything. We reinserted the center retainer and the grub screw to put any fears to rest about a good fit prior to welding. All was well.
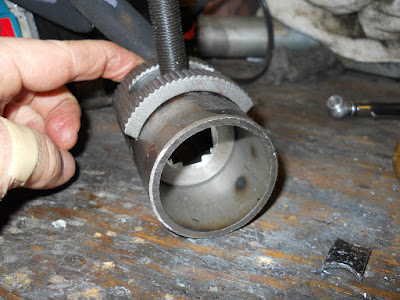
I welded the ends of the serrated piece to the beam and cleaned everything up nicely. A little note of caution here, the center retainer fit perfectly prior to welding, however, it was too tight after welding! As you can see, we were getting really good penetration with the weld.

We needed to hone out the inside of the beam section a bit and go after the center retainers with the disk sander to remove a few thousandths for that nice happy fit.

With this completed, we cut a matching section out of the good beam. This is a bit disconcerting, but measure twice and have at it.
Since the intent of adding the adjuster for me was to lower the car, I positioned the adjusters so I would only have a little bit of additional up in the adjustment (about 1/8” from the grub screw to the stop point) from the stock position, and all the rest of the adjustment would be in the down direction. I figured if the springs ever got a bit weak and I wanted to run the car at a stock height, I could make that happen.

Once all was aligned and ready, I taped the threads of the grub screw and the slot with masking tape so no weld spatter would get where it wasn’t supposed to. I then welded the new center section in place and cleaned up the weld.

As a side note here, all the welding was done using my cheapie Century wire feed mig welder with flux core wire. Take your time and this is a very easy welding project. This is the kind of metal they give you in welding class the first day you start welding because it’s so easy to weld on.
After celebrating our success of the first beam section, we got to work on the lower beam. As you can see in the pics, this portion of the job went quite well and the second tube goes much faster than the first because you know what the heck you are doing.

Now since I am in the middle of this restoration/mod of this car, there is no way for me to tell if any of this work will perform it’s job as intended. I can’t see any reason why not, but I can’t see lots of things!
Some lessons learned along the way: The Avis adjuster kit comes with two screws. One small grub screw which looks like it is supposed to go in the center retainer and wedge into the leaf spring stack, and the longer screw that is supposed to pass through the beam and pinch the retainer to the serrated section of the kit to keep the center retainer from spinning. This doesn’t work in practice however. In order to install the small screw, the springs need to be inserted. Once you tighten this screw, it separates the leaves and opens the center retainer slit and locks it into the beam. Now, being unable to rotate the center retainer, you cannot adjust the beam. It makes no sense to install the screw and leave it loose, so I ground the 45 Deg. point onto the longer screw and that will both, wedge the leaves open, and serve as the lock screw.

The only thing I can think of here is that the small set/grub screw is just a temporary screw used to push the center section into the beam to get it aligned with the slot. If you then removed this small screw and replaced it with the longer bolt, that would make sense. However, since we made new center sections, we did not need this part.
Another thought for anyone attempting this that does not have the luxury of a helpful brother-in-law and a spare donor beam, I am thinking it would still be possible to use this method using only one beam. If you mark and cut the first cut about one inch to one side of the original beams grub screw, and the second cut about 2” to the other side of the grub screw, you can remove this “off center” section, clean it out and beat the original center retainer out with the pieces up on the bench where it is easy to work on.; Now flip this section end for end and drill and cut your slot in the nice smooth portion of the tube. When you weld it back in, just make sure it is flipped. The new center retainer will be on center and the location of the old center section which is now banged up a bit from pounding out the original center section is off center by one inch. You would need to weld up the original grub screw hole to seal the beam up nicely.

Good luck with your adjusters,
Hope this helps someone.
Camper
For this project, I started with the 67’ ball joint beam that was stock from my car. My beam was in great shape and I didn’t want to replace the needle bearings with urethane, or Delrin; the stock needles are working great.
First off, I stripped the beam of everything but the needle bearings and cleaned the beam up so the main chunks of old crud were scrapped off and I could handle it without getting all nasty.
Now, here is where it got fun! My Brother-in-law, Steve, stopped by and brought along a spare beam, you know, because everyone has one for just such an occasion. We bench engineered for about 20 minutes and decided it would be easiest to cut sections out of the donor beam and use these to install the center retainers. Remember, I was worried about saving the bearings, and beating the center retainers loose with a big pipe, or rod and a sledge hammer just didn’t seem like a good thing to do to the bearings. So cut we did!

Now, the main tubes for the Beetle beam are much thinker than I thought, it’s .160” (4mm) thick and took some work to cut it. We used a sawzall and ran it nice and slow while Steve dribbled Tap-Magic (the best stuff on the planet by the way) on the cut while I sawed away. Worked great. We took about a 3” (75mm) section out of the middle of the upper tube to start with. It works really nicely to cut and install the adjusters in only one tube at a time, that way you don’t loose alignment of the tubes.
We placed the curved serrated piece of the adjuster kit on the section of tube we just extricated from the donor and scribed marks to show us where the slot would need to be made. I center-punched the end holes and drilled those out with a 5/16” (16mm ish.) drill bit.

Next I cut the rest of the slot using the sawzall method again.

Being of the "chicken" variety, I made the slot a bit narrow and I opened it up using the angle grinder.

This slot is not critical and could be made a couple of mm oversize and not hurt anything. We reinserted the center retainer and the grub screw to put any fears to rest about a good fit prior to welding. All was well.

I welded the ends of the serrated piece to the beam and cleaned everything up nicely. A little note of caution here, the center retainer fit perfectly prior to welding, however, it was too tight after welding! As you can see, we were getting really good penetration with the weld.

We needed to hone out the inside of the beam section a bit and go after the center retainers with the disk sander to remove a few thousandths for that nice happy fit.

With this completed, we cut a matching section out of the good beam. This is a bit disconcerting, but measure twice and have at it.
Since the intent of adding the adjuster for me was to lower the car, I positioned the adjusters so I would only have a little bit of additional up in the adjustment (about 1/8” from the grub screw to the stop point) from the stock position, and all the rest of the adjustment would be in the down direction. I figured if the springs ever got a bit weak and I wanted to run the car at a stock height, I could make that happen.

Once all was aligned and ready, I taped the threads of the grub screw and the slot with masking tape so no weld spatter would get where it wasn’t supposed to. I then welded the new center section in place and cleaned up the weld.

As a side note here, all the welding was done using my cheapie Century wire feed mig welder with flux core wire. Take your time and this is a very easy welding project. This is the kind of metal they give you in welding class the first day you start welding because it’s so easy to weld on.
After celebrating our success of the first beam section, we got to work on the lower beam. As you can see in the pics, this portion of the job went quite well and the second tube goes much faster than the first because you know what the heck you are doing.

Now since I am in the middle of this restoration/mod of this car, there is no way for me to tell if any of this work will perform it’s job as intended. I can’t see any reason why not, but I can’t see lots of things!
Some lessons learned along the way: The Avis adjuster kit comes with two screws. One small grub screw which looks like it is supposed to go in the center retainer and wedge into the leaf spring stack, and the longer screw that is supposed to pass through the beam and pinch the retainer to the serrated section of the kit to keep the center retainer from spinning. This doesn’t work in practice however. In order to install the small screw, the springs need to be inserted. Once you tighten this screw, it separates the leaves and opens the center retainer slit and locks it into the beam. Now, being unable to rotate the center retainer, you cannot adjust the beam. It makes no sense to install the screw and leave it loose, so I ground the 45 Deg. point onto the longer screw and that will both, wedge the leaves open, and serve as the lock screw.

The only thing I can think of here is that the small set/grub screw is just a temporary screw used to push the center section into the beam to get it aligned with the slot. If you then removed this small screw and replaced it with the longer bolt, that would make sense. However, since we made new center sections, we did not need this part.
Another thought for anyone attempting this that does not have the luxury of a helpful brother-in-law and a spare donor beam, I am thinking it would still be possible to use this method using only one beam. If you mark and cut the first cut about one inch to one side of the original beams grub screw, and the second cut about 2” to the other side of the grub screw, you can remove this “off center” section, clean it out and beat the original center retainer out with the pieces up on the bench where it is easy to work on.; Now flip this section end for end and drill and cut your slot in the nice smooth portion of the tube. When you weld it back in, just make sure it is flipped. The new center retainer will be on center and the location of the old center section which is now banged up a bit from pounding out the original center section is off center by one inch. You would need to weld up the original grub screw hole to seal the beam up nicely.

Good luck with your adjusters,
Hope this helps someone.
Camper
Front beam work
Front beam is off and the "guts" are being removed in prep for the addition of beam adjusters. This is a very messy job. There is a bunch of grease in there!

The next step in the beam re-do process was to replace the ball joints. Now I can't take credit for this trick to remove ball joints without any special tools (except for a welder!) but I will pass it along for anyone who is in need of ball joint replacement.
The first thing to do is block up the torsion arm, on some good solid steel supports so the threaded end is pointing up.

Next, you need to smack the threaded end with a serious hammer a few times. This will "blow" the ball/bolt piece right through the cap side of the joint. This will require several blows, but it will pop through with enough persuasion. Sometimes you will need to cut the threaded end of the ball off to keep it from tipping over when you hit it. Just leave a 1/2" or so sticking up so you can beat it through the other side.

There is a plastic liner inside the joint, this will need to be dug out. Now using your welder lay a bead of weld inside the old bearing surface of the old ball joint. This will temporarily swell the bearing race and break the rust loose.

Set it aside and let it cool to room temperature. Now prop the arm up on the steel block again and insert a nice piece of rod or steel to pound on. At this point, the old ball joint will pound right out with only a ball peen hammer.

Nothing to it. No need to buy special tools, or to have a shop press them out for you. I have seen people beat the crap out of these arms to get the bearings out. No need for that, it will pop right out with this trick. Hope this helps someone along the way.
Note:
When you reinstall the new joints, wake sure you align the notches on the new ball joints so they are oriented fore and aft to the car. Three of the four ball joints in this particular car were installed incorrectly. (Off Axis.) This created a premature joint failure and a terrible bind in the steering.

The next step in the beam re-do process was to replace the ball joints. Now I can't take credit for this trick to remove ball joints without any special tools (except for a welder!) but I will pass it along for anyone who is in need of ball joint replacement.
The first thing to do is block up the torsion arm, on some good solid steel supports so the threaded end is pointing up.

Next, you need to smack the threaded end with a serious hammer a few times. This will "blow" the ball/bolt piece right through the cap side of the joint. This will require several blows, but it will pop through with enough persuasion. Sometimes you will need to cut the threaded end of the ball off to keep it from tipping over when you hit it. Just leave a 1/2" or so sticking up so you can beat it through the other side.

There is a plastic liner inside the joint, this will need to be dug out. Now using your welder lay a bead of weld inside the old bearing surface of the old ball joint. This will temporarily swell the bearing race and break the rust loose.

Set it aside and let it cool to room temperature. Now prop the arm up on the steel block again and insert a nice piece of rod or steel to pound on. At this point, the old ball joint will pound right out with only a ball peen hammer.

Nothing to it. No need to buy special tools, or to have a shop press them out for you. I have seen people beat the crap out of these arms to get the bearings out. No need for that, it will pop right out with this trick. Hope this helps someone along the way.
Note:
When you reinstall the new joints, wake sure you align the notches on the new ball joints so they are oriented fore and aft to the car. Three of the four ball joints in this particular car were installed incorrectly. (Off Axis.) This created a premature joint failure and a terrible bind in the steering.
Sunday, December 12, 2010


Friday, December 10, 2010
Pan replacement.
The pans in the Beetle were pretty much shot. They really needed to be replaced. I found a pair of pans from one of the guys in our local club and picked them up pretty reasonable. I started out by cutting out the old pans. I left about a half inch lip all around the inside of the tunnel and front and rear support areas. This will allow me to set the new pans on top of this lip and weld them in for a nice professional job.


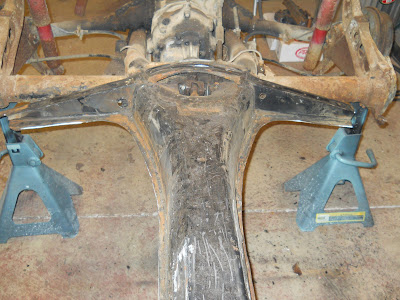


The next thing was to get the new pans trimmed to fit onto the chassis. I measured and trimmed and got the pans fitting really well. These must have been really nice pans. They are well shaped and the holes are all in the right places. Great to work with nice panels.


The next thing was to get the new pans trimmed to fit onto the chassis. I measured and trimmed and got the pans fitting really well. These must have been really nice pans. They are well shaped and the holes are all in the right places. Great to work with nice panels.


Subscribe to:
Posts (Atom)