After some serious consideration, I have decided to sell the Beetle project. I simply do not have the room to continue the parts shuffling and storage. I was completely unprepared for the fact that a small little car will expand to at least three times it's size when you take it all apart. So, it is gone. I sold it to my Brother in law and he is well on his way to completing it. I had the vast majority of the body work done when it left, so his body work guy is progressing nicely. I am still storing the pan for him, but I think that will be delivered soon.
The good part of all this is; I will be able to keep tabs on the project as he progresses. I will post pics as I get the chance. For now, I will just keep tinkering with the bus and enjoying the ride.
If you would like to check out my bus blog, it's located here: http://thevwbusblog.blogspot.com/
Thanks for following along.
Wednesday, August 8, 2012
Monday, February 21, 2011
A few more projects off the list
So today I got a few more things done; I got the rear spring plates installed. Now I want to lower the back about 2", so I found a nifty little chart on the Samba.
http://www.thesamba.com/vw/forum/viewtopic.php?t=237102
This chart tells me I need to change the angle of my spring plates to 7 1/2 Deg. less than stock to reach my 2" drop. My manual tells me my 67' with the rear anti sway should be set to 20 Deg. to be at the stock ride height. That means I need to set the arms at 12 1/2 Deg. to give me the drop I am looking for. To get to this angle, I leveled the pan using my 4' bubble level.
![[image]](http://i758.photobucket.com/albums/xx222/Scottyh2/67%20Beetle%20Project/DSCN0792.jpg "[image]")
Next I used a digital level app for my Ipod touch to set the angle. I then bolted on the caps and it should be ready to go with a 2" drop. What that means is that I will only have to take it apart, adjust it, and put it back together about 5 times instead of 7.
![[image]](http://i758.photobucket.com/albums/xx222/Scottyh2/67%20Beetle%20Project/DSCN0793.jpg "[image]")
![[image]](http://i758.photobucket.com/albums/xx222/Scottyh2/67%20Beetle%20Project/DSCN0794.jpg "[image]")
I got the calipers painted and put back together also.
![[image]](http://i758.photobucket.com/albums/xx222/Scottyh2/67%20Beetle%20Project/DSCN0799.jpg "[image]")
And I got the chrome lock nut set installed on the trans axle.
![[image]](http://i758.photobucket.com/albums/xx222/Scottyh2/67%20Beetle%20Project/DSCN0802.jpg "[image]")
I was starting to put the tie rods on to the steering arm and I discovered they are all the wrong size. They are too big in diameter! I didn't know there were two sizes. I need to figure out which parts I ordered and what parts I need to order next.
http://www.thesamba.com/vw/forum/viewtopic.php?t=237102
This chart tells me I need to change the angle of my spring plates to 7 1/2 Deg. less than stock to reach my 2" drop. My manual tells me my 67' with the rear anti sway should be set to 20 Deg. to be at the stock ride height. That means I need to set the arms at 12 1/2 Deg. to give me the drop I am looking for. To get to this angle, I leveled the pan using my 4' bubble level.
Next I used a digital level app for my Ipod touch to set the angle. I then bolted on the caps and it should be ready to go with a 2" drop. What that means is that I will only have to take it apart, adjust it, and put it back together about 5 times instead of 7.
I got the calipers painted and put back together also.
And I got the chrome lock nut set installed on the trans axle.
I was starting to put the tie rods on to the steering arm and I discovered they are all the wrong size. They are too big in diameter! I didn't know there were two sizes. I need to figure out which parts I ordered and what parts I need to order next.
More beam work
Today found me in the garage with a few hours to work, a good day for sure. I started out by cutting the torsion springs to length. 1 1/2" off each end so I could keep the center dimple in the center!
![[image]](http://i758.photobucket.com/albums/xx222/Scottyh2/67%20Beetle%20Project/DSCN0774.jpg "[image]")
Next I drilled a small pilot hole .35" from the end of the springs for the end dimples. One on the same side as the center dimple, and the other on the opposite side. After the pilot hole was drilled, I formed the dimple using a standard counter sink. I opened the dimple to match the originals. The trick it to go nice and slow and use a fair amount of TapMagic. The springs will drill easily. Note the bevel ground on the end of the springs. This is to ease the insertion through the center tube block.
![[image]](http://i758.photobucket.com/albums/xx222/Scottyh2/67%20Beetle%20Project/DSCN0771.jpg "[image]")
![[image]](http://i758.photobucket.com/albums/xx222/Scottyh2/67%20Beetle%20Project/DSCN0772.jpg "[image]")
![[image]](http://i758.photobucket.com/albums/xx222/Scottyh2/67%20Beetle%20Project/DSCN0773.jpg "[image]")
After the springs were done, I assembled the beam and installed the swing arms. Lots more grease. I inserted the springs into one of the swing arms. I tightened the set screw to hold everything in place. On the end that I inserted into the beam, I wrapped the spring leaves with a zip tie about 1" from the end. This held the leaves in place while I slid the springs in. Once the spring passed through the center block, I continued to push and the zip tie just slid down the springs. Worked great.
![[image]](http://i758.photobucket.com/albums/xx222/Scottyh2/67%20Beetle%20Project/DSCN0779.jpg "[image]")
On to the sway bar. I cut the sway bar in the middle and installed the two ends onto the swing arms. I then clamped them in the middle and marked my cut. I cut the ends and ground a pretty steep bevel onto the ends for the weld.
![[image]](http://i758.photobucket.com/albums/xx222/Scottyh2/67%20Beetle%20Project/DSCN0782.jpg "[image]")
![[image]](http://i758.photobucket.com/albums/xx222/Scottyh2/67%20Beetle%20Project/DSCN0785.jpg "[image]")
I welded the sway bar in the center and peened the weld joint many times to relieve any heat induced stresses. I mounted the bar in the vice and stuck a piece of pipe on the end of the sway bar and twisted the sway bar back and forth, I made sure I was swinging it past the farthest twist it would see in use. No problem, the weld was fine. I then cleaned the weld up, primed and painted the sway bar. Enough for one day. I am waiting for my drop spindles now. They should be here next week.
![[image]](http://i758.photobucket.com/albums/xx222/Scottyh2/67%20Beetle%20Project/DSCN0788.jpg "[image]")
Next I drilled a small pilot hole .35" from the end of the springs for the end dimples. One on the same side as the center dimple, and the other on the opposite side. After the pilot hole was drilled, I formed the dimple using a standard counter sink. I opened the dimple to match the originals. The trick it to go nice and slow and use a fair amount of TapMagic. The springs will drill easily. Note the bevel ground on the end of the springs. This is to ease the insertion through the center tube block.
After the springs were done, I assembled the beam and installed the swing arms. Lots more grease. I inserted the springs into one of the swing arms. I tightened the set screw to hold everything in place. On the end that I inserted into the beam, I wrapped the spring leaves with a zip tie about 1" from the end. This held the leaves in place while I slid the springs in. Once the spring passed through the center block, I continued to push and the zip tie just slid down the springs. Worked great.
On to the sway bar. I cut the sway bar in the middle and installed the two ends onto the swing arms. I then clamped them in the middle and marked my cut. I cut the ends and ground a pretty steep bevel onto the ends for the weld.
I welded the sway bar in the center and peened the weld joint many times to relieve any heat induced stresses. I mounted the bar in the vice and stuck a piece of pipe on the end of the sway bar and twisted the sway bar back and forth, I made sure I was swinging it past the farthest twist it would see in use. No problem, the weld was fine. I then cleaned the weld up, primed and painted the sway bar. Enough for one day. I am waiting for my drop spindles now. They should be here next week.
Old hole filled and a new one 1" outboard is complete.
I stopped by the local hardware store and picked up a pipe plug on the way home. I threaded it in as tight as I dare turn it. I then cut it off close to the beam and ground it pretty close to flush with the tube. I then peened the edges of the plug with a ball peen hammer to help make it flush and to lock it in the tube.
![[image]](http://i758.photobucket.com/albums/xx222/Scottyh2/67%20Beetle%20Project/DSCN0766.jpg "[image]")
![[image]](http://i758.photobucket.com/albums/xx222/Scottyh2/67%20Beetle%20Project/DSCN0767.jpg "[image]")
Next I drilled and taped the hole for the Zerk fitting.
![[image]](http://i758.photobucket.com/albums/xx222/Scottyh2/67%20Beetle%20Project/DSCN0768.jpg "[image]")
Next I sanded the old paint, added a shot of etch primer, and painted the beam. I threaded the Zerk back in and it's ready to go, again!
![[image]](http://i758.photobucket.com/albums/xx222/Scottyh2/67%20Beetle%20Project/DSCN0769.jpg "[image]")
![[image]](http://i758.photobucket.com/albums/xx222/Scottyh2/67%20Beetle%20Project/DSCN0770.jpg "[image]")
Next I drilled and taped the hole for the Zerk fitting.
Next I sanded the old paint, added a shot of etch primer, and painted the beam. I threaded the Zerk back in and it's ready to go, again!
Ahh, the joys of building a custom car!
Just when you think you have it ready, you have to take it back apart and make changes. I had the beam back on the pan (for the third time!) and I was all excited to mount the shinny new steering box and I discovered the steering box now sits right over the Zerk fitting on the top tube. Now I need to weld up the old hole and drill and tap a new one. I remember reading this on a thread on the Samba, but I couldn't figure out what it meant, I think I know now.


Wednesday, February 9, 2011
Shiney pan ready for re-assembly
After a bit of prep work, a little sanding, and putting up plastic all over the walls of the shop, I was ready to paint the pans. I used a single stage paint system from Sherwinn Williams called 2nd dimension. This is an enamel based system with a hardener. I have had good luck with this in the past and it works quite well. Seems to be shinny enough for something most folks will never get to see.


On with the pans and into the fire?
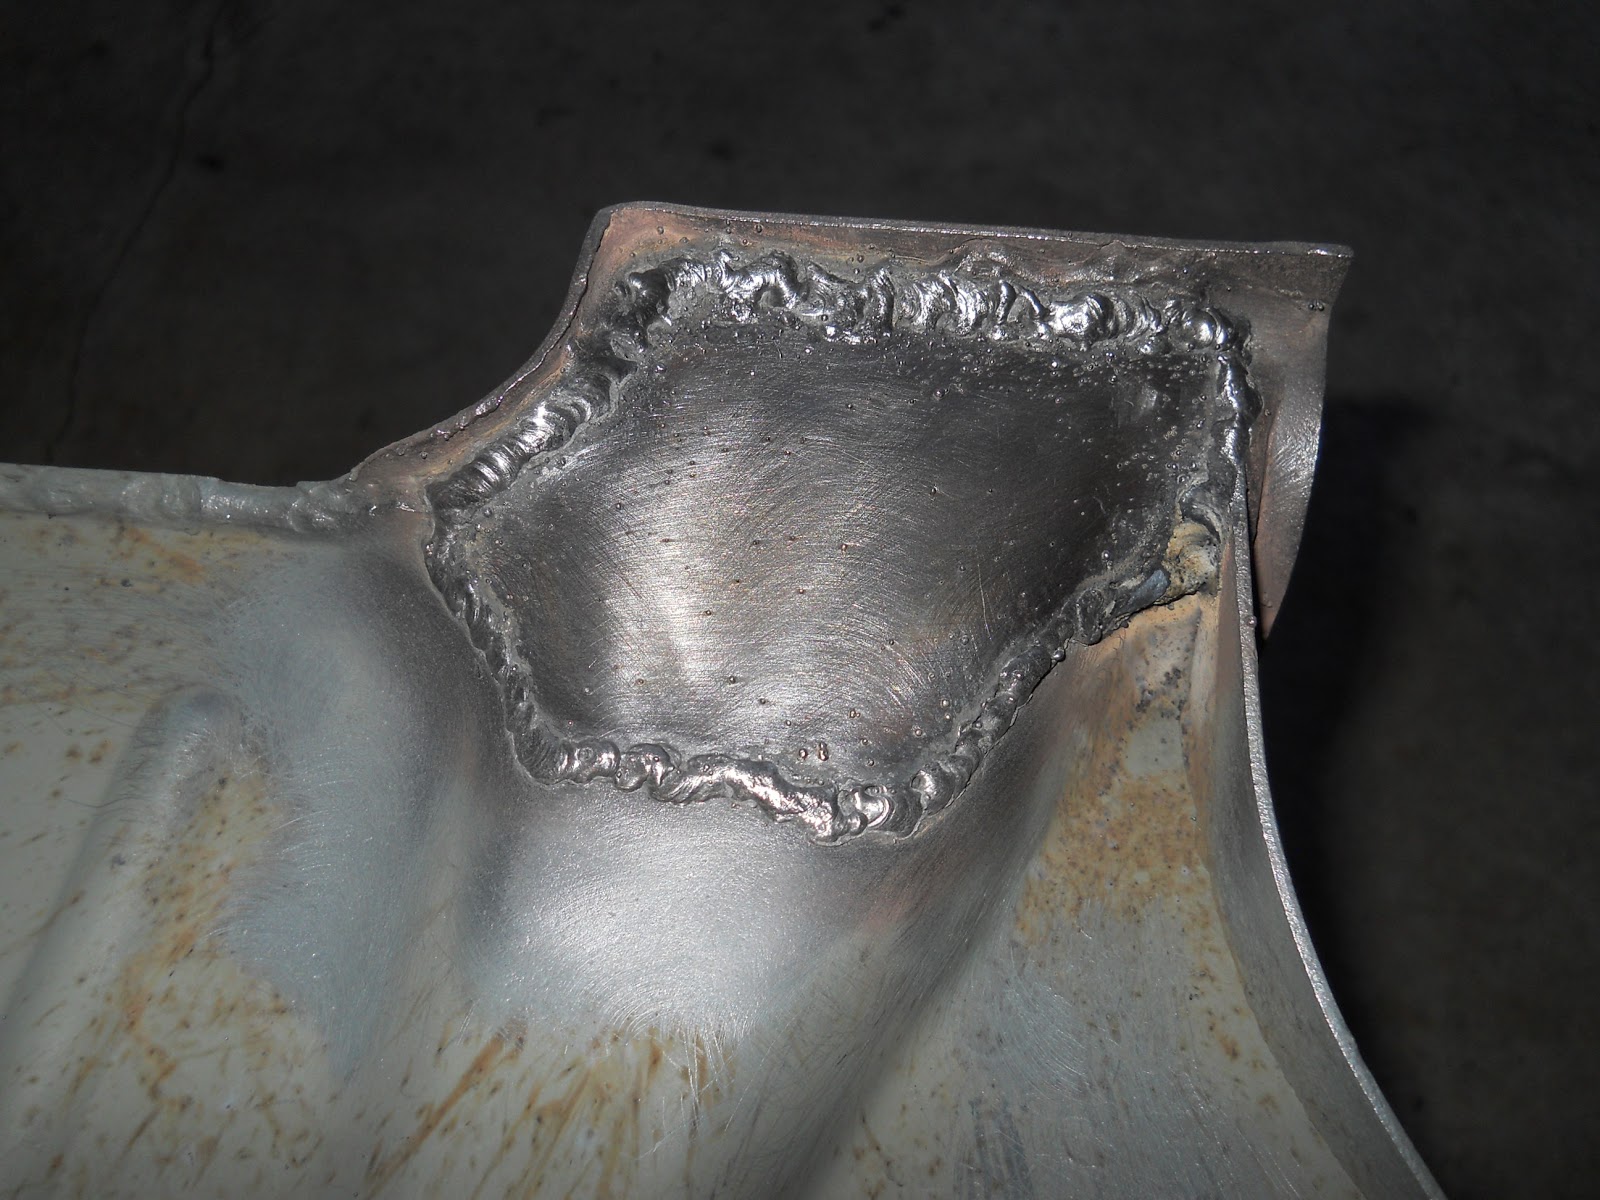
Steve stopped by again this weekend and we set to work welding in the floor pans. I started out by drilling 3/16" (.187" Just less than 5mm) diameter holes every 2" (50mm) along the edge to be welded on top of the remaining flange.

 I debured the back sides of the holes to be sure the new pans would lay flat on the flange and then we puddle welded the pans in place. The tunnel flange metal is much thinker than the new pan metal, so I started by building a small pile of weld in the center of the hole with the arc striking on the tunnel flange only. After a couple of seconds of this "build up", I let the molten puddle "spill" onto the edge of the new pan. It worked great, the welds are very strong and look pretty good as well.


After welding, we wiped things up a bit and sealed the seams with calking gun style seam sealer purchased from Autozone for $9.00 ish. Once applied, I smoothed the sealer bead out with my finger (inside a glove!) I almost think a small brush might have worked better in this case, but I was already committed to the finger method. Overall it came out pretty well. I need to shoot on a bit more etch primer, give the pan a quick sand and shoot on the paint. Hopefuly this weekend.


After welding, we wiped things up a bit and sealed the seams with calking gun style seam sealer purchased from Autozone for $9.00 ish. Once applied, I smoothed the sealer bead out with my finger (inside a glove!) I almost think a small brush might have worked better in this case, but I was already committed to the finger method. Overall it came out pretty well. I need to shoot on a bit more etch primer, give the pan a quick sand and shoot on the paint. Hopefuly this weekend.


After everything was primed, I noticed a small rust hole on the bottom of the tunnel, just behind the front beam mount. I made up a quick patch for this spot and welded it in place. It formed very easily and welded up great. I ground it down a bit and sprayed on a bit of etch primer, drilled in a drain hole and I think it's ready to paint.

Subscribe to:
Posts (Atom)